
Our Stunning Ranges of Metal Gates
Shop our great ranges & deals
This comprehensive guidance will help you install your new wooden gates, we’ve provided a general installation guide below. Please keep in mind that this information is for reference only and may not apply to every installation. Always follow the instructions supplied with your specific product. If you’re unable to install it yourself, we recommend hiring a builder, joiner, or another qualified professional to complete the work.
If your posts are already installed and ready to go you can skip ahead to Step 3
We’ve detailed exactly how to install both: In ground (concrete in) posts & Wall mounted posts.
Please click the links below if you still need to install your posts:
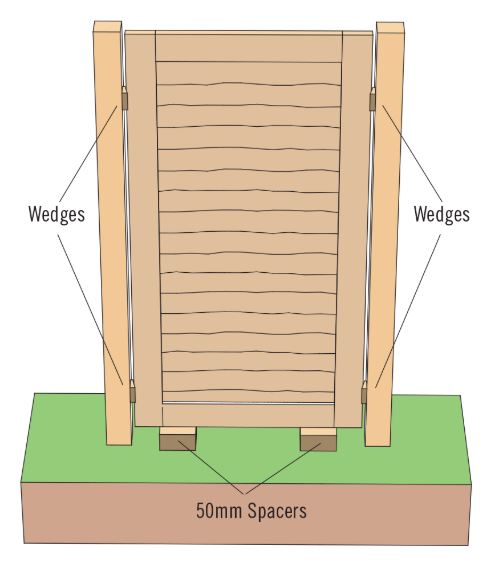
Example “pack out” preparation image:
For Double Wooden Gates Only
As per our measuring guide, you would have accommodated an additional 40mm allowance onto your total gate “width” prior to ordering.
This “allowance” will now be used to align and centre your gates between your posts equally, you may do this however you see fit, we recommend to leave at least a 14mm gap between the gate side and the post on both sides.
This will leave you with a 12mm gap where the gates meet in the middle for the latch. Measure and adjust accordingly to suit your needs:
(Left-side: 14mm, + Right-side: 14mm, + Latch Gap 12mm = Total 40mm).
For Single Wooden Gates Only
As per our measuring guide, you would have accommodated an additional 20mm allowance onto your total gate “width” prior to ordering.
This “allowance” will now be used to align and centre your gate between your posts, you may do this however you see fit, we recommend to leave at least a 10mm gap between the gate side and the post.
This will leave you with another 10mm gap on the latch side and the post. Measure and adjust accordingly to suit your needs:
(Hinge side: 10mm, + Latch side: 10mm, = Total 20mm).

Not sure which gate suits your needs? Our experts are happy to help. Get in touch today and find the perfect garden gate, driveway gate, or side gate for your property!