How to Install Metal Gates

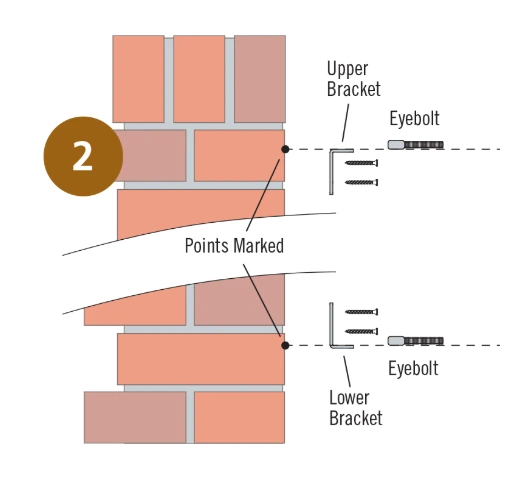
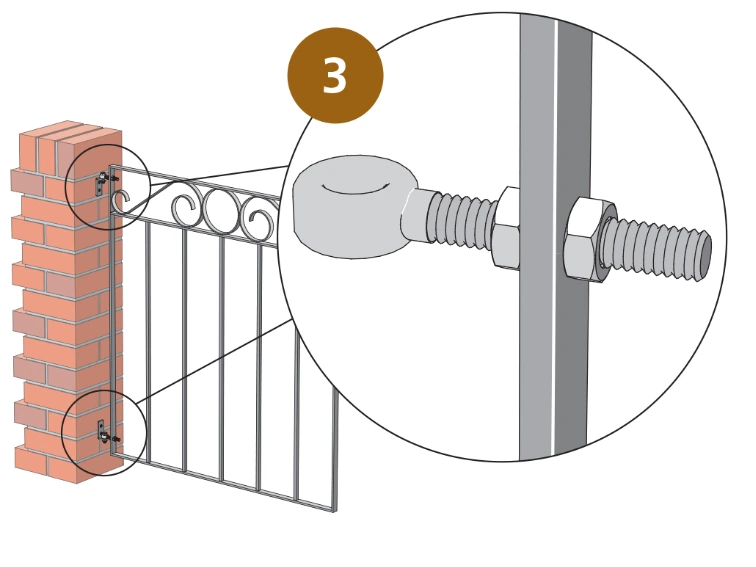
Installing metal gates is a straightforward process that even a DIY beginner can handle, provided the gates are the correct size for the opening.

Before you begin, ensure that any brick pillars, walls, or posts are strong enough to support the weight of the gates.

Tools You’ll Need

✔ Hammer
✔ Spirit level
✔ Various drill bits
✔ Screwdriver
✔ Small selection of spanners

Step-by-Step Installation Guide

1. Position the First Gate

  • Attach the hinges to the gate frame.
  • To allow for ground clearance (typically 50mm), place a piece of timber under the bottom rail to lift the gate to the correct height (assuming your ground level is flat). If you have a sloped ground level you may have to increase / decrease this height accordingly to suit your situation.
  • Position the gate within the opening.

2. Mark and Drill the Fixing Points

  • Slide the top hinge plate through the i-bolt of the hinge and hold it against the brickwork in the correct position.
  • Mark the fixing hole locations.
  • Repeat the process for the lower hinge plate, ensuring the top hinge remains in place.
  • Use a spirit level to check the gate is vertical, then mark the lower hinge fixing points.

3. Secure the Hinges to the Wall

  • Remove the gate and set it aside.
  • Using a hammer drill with the correct bit, drill holes at the marked positions.
  • Insert wall plugs or anchors until they are flush with the brick surface.
  • Reposition the gate and securely fasten all fixings.
  • Adjust the hinges to ensure the gate sits level.

4. Fit the Second Gate (If Applicable)

  • Repeat the above steps for the second gate.
  • Make sure both gates are aligned and at the same height for a neat, professional finish.

5. Install the Latch and Drop Bolts

  • Close both gates so they meet evenly. Attach the latch using the provided nut and bolt.
  • Mark the ground where the drop bolts will be positioned.
  • Open both gates fully and mark the drop bolt positions in the open position as well.
  • Use a hammer drill to create holes deep enough for the drop bolts to slide into.

6. Final Touches

  • The installation is now complete! To protect the metal from rust and enhance its appearance, apply two coats of high-quality exterior-grade paint.

Contact Us for Expert Advice

Not sure which gate suits your needs? Our experts are happy to help. Get in touch today and find the perfect gate for your property!